Robot Defense

Project Information

  1. Dev team & Development environment
  2. Development Process
  3. Gameplay
  4. Post Mortem

Game mechanics showcase

  1. Tiles & Tile generation
  2. UI
  3. Towers
  4. Enemies

Project Information

The project was called Tower Defense but the name of the game is Robot Defense, we had 8-10 weeks to make a tower defense game and we worked with sprints, each sprint was 2 weeks long. The game had some requirements that had be added to the game, which are:
  • 3 types of enemies: 1 base enemy, 1 fast and 1 strong enemy
  • A wave, Build & level generation system. The level had to be generated out of 3 different types of tiles: 1 were you can build towers on, 1 that doesnt do anything and 1 where the enemies walk over
  • 3 types of towers: 1 Rapid fire tower that shoots fast but does low damage, 1 Tower that does AoE damage and 1 that slows enemies in a certain radius
These were the game mechanics/elements that had to be added, there we also more optional thing that could be added like: Tower upgrades & level building/editing.

In this project you could either work alone or together with someone in a duo. I chose to work alone for this project because i wanted to work on my own pace and really make a good project, we had to use Trello to show our progress during development and to keep tabs on what to do. We used Github to keep a backup of our project at all times, the engine of choice was Unity (Version 2020.3.5f1) for at the time of the project we only knew C#. I also bought some 2D game assets because i had a little bit of money to spend so i decided to buy the two mention in the list below ,Other tools i used were:

The perks of working alone is you can choose when to start working and when to stop, there is nothing to wait for and nothing holding you back, you can make everything exactly how you want it because you have a clear picture in mind of what you want your game to look like. so i worked on the game i think 7-8 hours a day. another perk is that github is significantly easier to work with when you are alone, NO MORE MERGE CONFLICTS Anyways... The reason im saying this is because because in the first sprint which was 1 week all we had to do was brainstorm. i did just that and MORE. in the first week i already had a main & settings menu with animations, BGM and had already setup URP + post processing. And also had a gamescene where some simple UI was setup. After that i worked on making all the requirements, some hicups here and there and i was done with what i had to make halfway the project. I then decided to 1 additional boss enemy, 4 more towers and redid the enemy assets. after that i added a damage upgrade to each of the towers and mostly did bug fixing & polishing for the duration of the project See trello for to-do's & user stories and GitHub for commit history See Screenshots & Gifs to visually see how development went & Gameplay
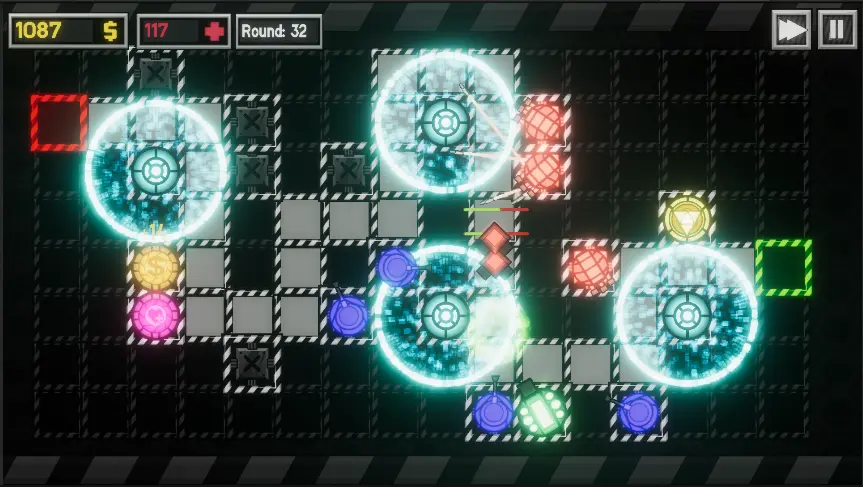
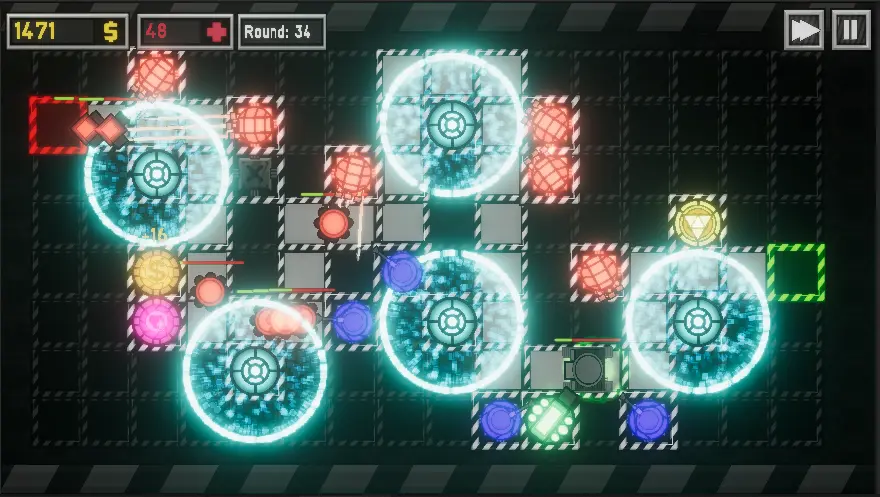
When you start the game you start off with 800 bucks, The general gameplay loop is that you build some towers and get money from killing enemies with the towers you placed, the end goal is to reach

wave 40

From wave 10 onwards the enemies gain more health each round so it is best to get better towers, upgrade towers or get a health tower or money tower to carry you through the later levels, as you go on more and more there will also be alot of tank enemies which have about ~66x the health of the heavy enemy who also gain more health the further you go

Eventually we had to present our project in a small group of fellow classmates, i was a bit nervious but i was happy to present a complete product. I was happy that i was able to do so much while also working on some other things and was happy that i got everything working. I was also super glad that my game stood out since most people copied from youtube tutorials. No offensive to anyone who does it especially beginners but its not for me. I was happy with the final product but at the time i 100% thought that i could have done some thing better, now that is even truer. Alot of optimization and rework of towers, tower upgrades & enemies using class inheritance/object composition and maybe interfaces. At the time of writing this, when i look back at it im still kind of proud at it even though i could do it better now.

Game Mechanics

Here you can see a screenshot of how the map looks when it is fully generated, The green tile is the starting tile and the red tile is the endtile, the grey colored tiles are tiles that enemies use to walk on and the tiles with the X on them are buildable tiles, the other tiles that are less visible have no purpose

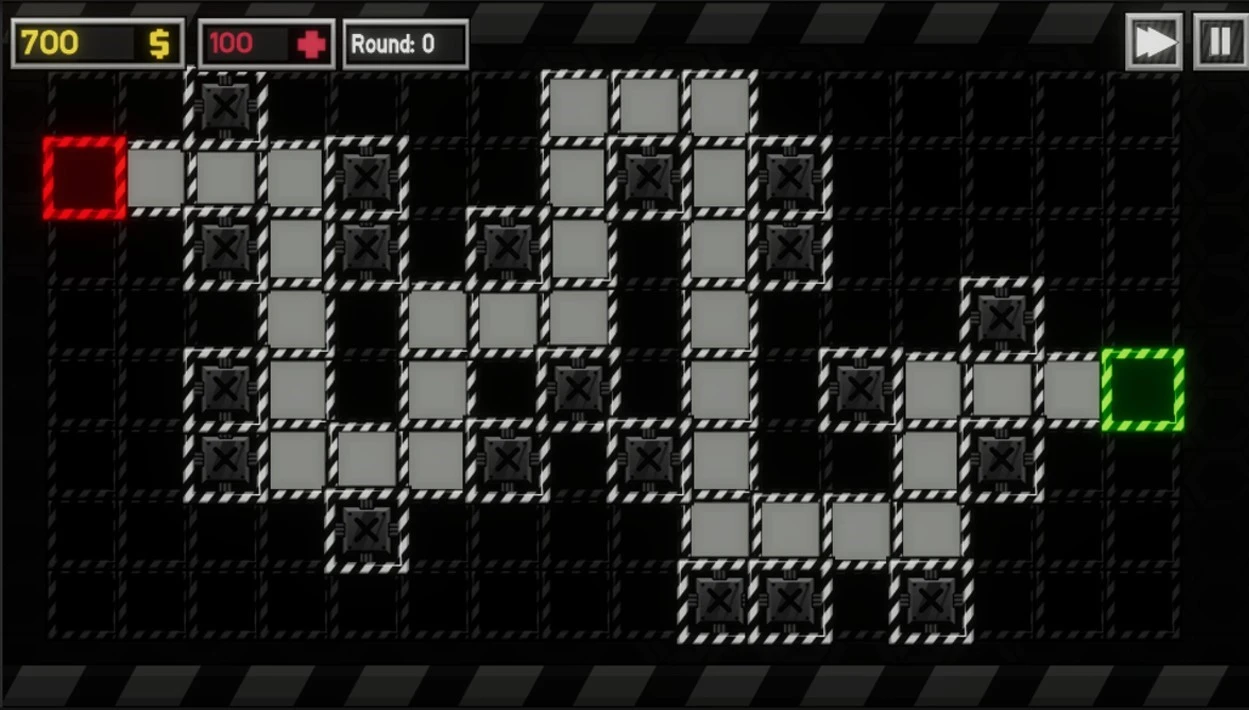
First i used a script that would generate a path on its own to the end point, but the paths would always be L shaped and very robotic looking, I scrapped that idea and make it use a 2D array where i could make the path more organic, It loops through the array for the X and Y axis then depending on what the number is, generates the tile linked to that number. Altough at the time i didnt know how to use switch cases so instead i used a bunch of if else statements. If i would re-visit this project i would improve upon this

Here you can see what would normally be done in a milisecond, this is the same function but with a delay when each tile gets generated to slow it down. You can see that it generates on the Y axis then goes on to the next collum on the X axis, this goes on until it finishes going through the entire 2D array,

Some more info about the Buildable tile: You can click on the buildable tile to open a shop menu where you can buy towers, then if you bought a tower you can click agian and either upgrade it to have better damage or sell it to get some amount of money back, here is a gif showing how the shop looks like. below that a code snippet of the buildable tile script, beware its not the pretiest code because at the time i did not know what a switch statement was

1

2

3

4

5

6

7

8

9

10

11

12

13

14

15

16

17

18

19

20

21

22

23

24

25

26

27

28

29

30

31

32

33

34

35

36

37

38

39

40

41

42

43

44

45

46

47

48

49

50

51

52

53

54

55

56

57

58

59

60

61

[SerializeField] private float yOffset; [SerializeField] private float xOffset; //0 = base | 2 = path | 3 = buildable | 4 = start | 5 = end tile int[,] TileMap = { {0,0,0,0,0,0,0,0,0,3,3,0,3,0,0,0}, {0,0,0,0,3,0,0,0,0,2,2,2,2,0,0,0}, {0,0,3,2,2,2,3,0,3,2,0,0,2,3,0,0}, {0,0,3,2,0,2,0,3,0,2,0,3,2,2,2,4}, {0,0,0,2,0,2,2,2,0,2,0,0,0,3,0,0}, {0,0,3,2,3,0,3,2,0,2,3,0,0,0,0,0}, {5,2,2,2,3,0,0,2,3,2,3,0,0,0,0,0}, {0,0,3,0,0,0,0,2,2,2,0,0,0,0,0,0} }; private void Start() { GenerateMap(); } void GenerateMap() { for (int y = 0; y < TileMap.GetLength(1); y++) { for (int x = 0; x < TileMap.GetLength(0); x++) { if (TileMap[x,y] == 0) { GameObject newTile = Instantiate(NormalTile); newTile.transform.position = new Vector2(y-yOffset, x-xOffset); newTile.transform.parent = MapGenObject.transform; } else if (TileMap[x,y] == 2) { GameObject newTile = Instantiate(PathTile); newTile.transform.position = new Vector2(y - yOffset, x - xOffset); newTile.transform.parent = MapGenObject.transform; } else if (TileMap[x,y] == 3) { GameObject newTile = Instantiate(BuildableTile); newTile.transform.position = new Vector2(y - yOffset, x - xOffset); newTile.transform.parent = MapGenObject.transform; } else if (TileMap[x, y] == 4) { GameObject newTile = Instantiate(StartTile); newTile.transform.position = new Vector2(y - yOffset, x - xOffset); newTile.transform.parent = MapGenObject.transform; InstantiatedStartingTile = newTile; } else if (TileMap[x, y] == 5) { GameObject newTile = Instantiate(EndTile); newTile.transform.position = new Vector2(y - yOffset, x - xOffset); newTile.transform.parent = MapGenObject.transform; } } } }

The first thing i did in the game was make a main menu & settings menu. The main menu was very simple to implement, and the settings menu i used from a previous project and tweaked it to have it work in URP (Universal Render Pipeline). The animations is mostly handled via the animator and called via script.

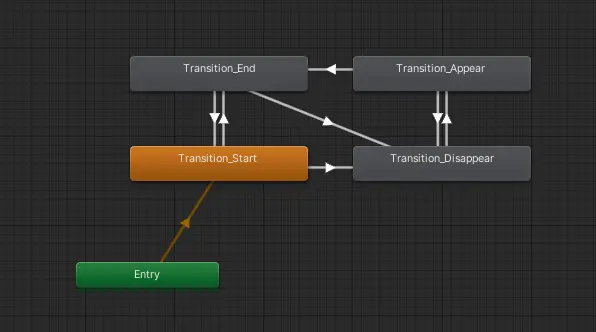
Here you can see the animation states and how they transition between each other. Start and end are normal closing and opening animations and the appear and dissapear are to move the top and bottom part offscreen so they dont block the ingame HUD/UI

here is a video of the settings menu, some changes like fullscreen and quality settings dont show any difference because the video is inside the editor instead of a seperate build. You can change the background volume and sound effects volume indepenantly, the post processing effects can also be turned on & off indepenantly or post processing can be turned of completely. Theres also a secret button hidden somewhere in the settings menu, see if you can find it :)

Here you can see the pause menu, it can be accessed by pressing escape or pressing the button on the top right. 1 thing i wanted is that when the pause button was pressed that it had a cooldown so it couldnt be pressed agian for a couple of seconds just to make sure things dont break. altough the pause menu doesnt have settings in them you can go back to the main menu, quit or resume

1

2

3

4

5

6

7

8

9

10

11

12

13

14

15

16

17

18

19

20

21

22

23

24

25

26

27

28

29

30

31

32

33

34

35

36

37

38

39

40

41

42

43

44

45

46

47

48

49

50

51

52

53

54

55

56

57

58

59

60

61

62

63

64

65

66

67

68

69

70

71

72

73

74

75

76

77

78

void Start() { float BGMSliderPerfs = PlayerPrefs.GetFloat("BGMSlider", 50); float SFXSliderPerfs = PlayerPrefs.GetFloat("BGMSlider", 50); BGMSlider.value = BGMSliderPerfs; SFXSlider.value = SFXSliderPerfs; SFXChanged(SFXSliderPerfs); BGMChanged(BGMSliderPerfs); VolumeProfile profile = m_Volume.sharedProfile; volumeobject.SetActive(true); /*resolutions = Screen.resolutions; resolutionDropdown.ClearOptions(); int currentResolutionIndex = 0; List<string> options = new List<string>(); for (int i = 0; i < resolutions.Length; i++) { string option = resolutions[i].width + "x" + resolutions[i].height; options.Add(option); if (resolutions[i].width == Screen.currentResolution.width && resolutions[i].height == Screen.currentResolution.height) { currentResolutionIndex = i; } } resolutionDropdown.AddOptions(options); resolutionDropdown.value = currentResolutionIndex; resolutionDropdown.RefreshShownValue(); */ } public void BGMChanged(float value) { BGMSliderVolume = value; FindObjectOfType<SoundManagerScript>().ChangeBGMVolume(BGMSliderVolume); BGMText.text = value + "%"; PlayerPrefs.SetFloat("BGMSlider", value); PlayerPrefs.Save(); } public void SFXChanged(float value) { SFXSliderVolume = value; FindObjectOfType<SoundManagerScript>().ChangeSFXVolume(SFXSliderVolume); SFXText.text = value + "%"; PlayerPrefs.SetFloat("SFXSlider", value); PlayerPrefs.Save(); } public void SetQuality(int qualityIndex) { QualitySettings.SetQualityLevel(qualityIndex); } public void SetFullScreen(bool isFullscreen) { Screen.fullScreen = isFullscreen; } public void TogglePostProcessing()... public void ToggleBloom()... public void ToggleToneMapping()... public void ToggleChromaticAbberation() { if (CA_toggle.isOn == true) { m_CA.active = true; CA_bool = true; } else { m_CA.active = false; CA_bool = false; } }

Here you can see how each tower looks like, Some of them just have normal assets were as the Money tower, Health tower and lightning tower have special animations, The slow tower itself doesnt have animation but does have a particle that shows the radius of the slow effect

Here is a list of what each tower does:

  • Rapid fire tower: Shoots fast but does low damage, Cheapest tower in the game.
  • Lightning tower: Shoots a lightning bolt that ricochets to 2 other nearby enemies.
  • Slow tower: Slows nearby enemies.
  • High caliber tower: Shoots very slowly but does massive damage, ideal tank killer.
  • Acid tower: Shoots a pit of acid doing DoT (Damage Over Time) for every enemy inside.
  • Money tower: Adds between 5-35 money every second and gives 100 after each wave.
  • health tower: Adds between 10-35 health after each wave.

Here you can see some code snippets from my most complex tower: The lightning tower, bassicly how it works is that the tower shoots a LightningCheck object that checks for enemies in a certain radius. then it stores that in a list and passes it to a LightningBolt object that does the actual damage. it goes to the first enemy in the list, then to the second then third. then the OnTriggerEnter2D handles the damaging part of it

1

2

3

4

5

6

7

8

9

10

11

12

13

14

15

16

17

18

19

20

21

22

23

24

25

26

27

28

29

30

31

32

33

34

35

public class LightningCheck : MonoBehaviour { private float _damage; private int _chaincount; private int _maxchaincount; public GameObject AoE_TowerReference; public GameObject lightningBolt; public LayerMask layer; public List<GameObject> Hit_Enemies = new List<GameObject>(); private void Start() { _maxchaincount = FindObjectOfType<AoETowerScript>().maxchaincount; Destroy(this.gameObject, FindObjectOfType<AoETowerScript>().timeBetweenShots); } private void OnTriggerEnter2D(Collider2D collision) { Collider2D[] enemiesInRange = Physics2D.OverlapCircleAll(transform.position, AoE_TowerReference.GetComponent<AoETowerScript>().radius, layer); foreach (Collider2D anEnemy in enemiesInRange) { if (anEnemy.CompareTag("Enemy") && !this.Hit_Enemies.Contains(anEnemy.gameObject) && this.Hit_Enemies.Count <= _maxchaincount) { this.Hit_Enemies.Add(anEnemy.gameObject); } } } private void Update() { layer = ~layer; }

1

2

3

4

5

6

7

8

9

10

11

12

13

14

15

16

17

18

19

20

21

22

23

24

25

26

27

28

29

30

31

32

33

34

35

36

37

38

39

40

41

public class LightningBolt : MonoBehaviour { public float LightSpeed; public float LightDamage; public GameObject LightningChecker; public GameObject AoETower; [SerializeField] private float LightningTime; public int i; private void Start() { i = 0; Destroy(this.gameObject, FindObjectOfType<AoETowerScript>().timeBetweenShots); } private void FixedUpdate() { if (i < FindObjectOfType<LightningCheck>().Hit_Enemies.Count) { if (FindObjectOfType<LightningCheck>().Hit_Enemies[i] != null) { transform.position = Vector2.MoveTowards(transform.position, FindObjectOfType<LightningCheck>().Hit_Enemies[i].transform.position, LightSpeed * Time.deltaTime); if (Vector2.Distance(transform.position, FindObjectOfType<LightningCheck>().Hit_Enemies[i].transform.position) < 0.1) { i++; } } else { i++; } } //this.transform.position += transform.right * LightSpeed * Time.deltaTime; } private void OnTriggerEnter2D(Collider2D col) { if (col.gameObject.tag == "Enemy") { col.gameObject.GetComponent<Enemy>().TakeDamage(LightDamage); } }

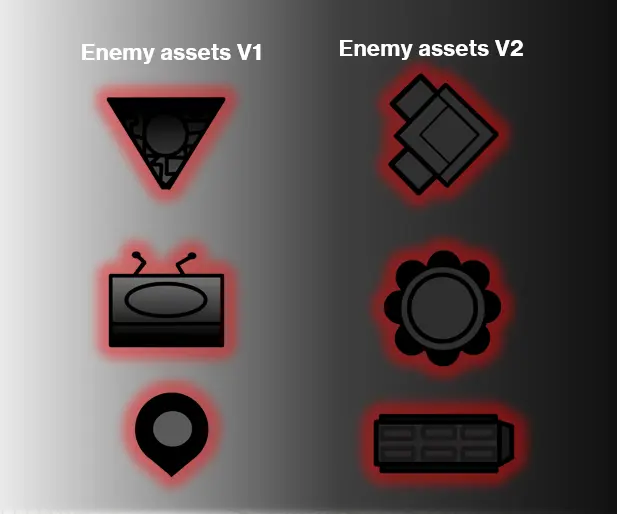
Im not very good at asset creation so during development i though the old enemy assets could use some rework and i also wanted to make them so they flat and not facing the camera so the enemies are also inline with the topdown design of the game

The enemy doesnt have alot of logic, all it does is more from 1 waypoint to another, in the gif its a bit hard to see but im cycling through all the waypoints so you can see where they are, right now they are just at static points but a better approuch would be to generate them with the map